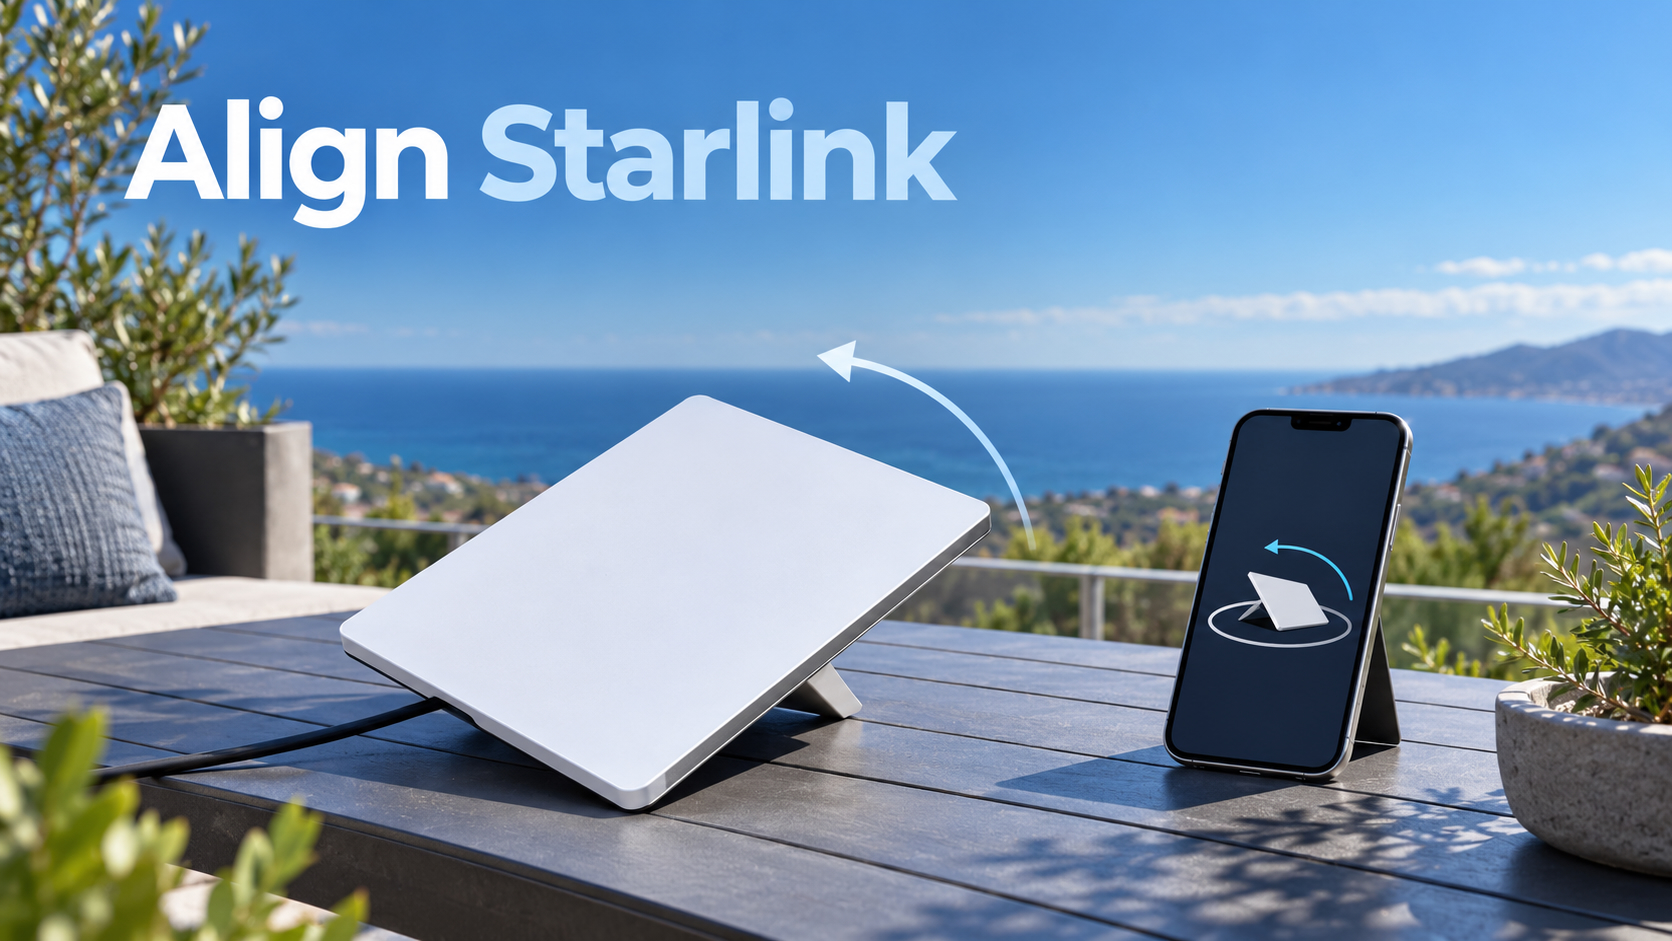
ALIGNMENT · CLEAR SKY VIEW · STARLINK APP · GERMAN EXAMPLES
How to align Starlink: direction, angle and app checks
Starlink availability: interactive world map
Select a country on the map or search for its name. Check local availability and offers directly with Starlink.
The interactive map is loaded. Without JavaScript, you’ll find all countries further down the “All countries by status” list.
USUnited States
Available
Starlink started here. Which tariffs, which hardware price and which actions apply to your address, shows the address checker on the Starlink card.
- Address verification free of charge and done in one minute
- Tariffs, hardware price and actions immediately visible
- No account needed to check availability
+1 month freewhen ordering via our referral link – according to Starlink in most places
Check availability at my addressStarlink prices in Germany
Status according to Starlink card data, as of 15.10.2026. The address verification at Starlink is binding.
Data base: public map data from Starlink, read out on 15.10.2026. Map basis: Natural Earth (general), German border representation, simplified. Small island states are presented as points.
Choose your market: current Starlink plans
Checked on 15 October 2026. Residential 100 Mbps and 200 Mbps are available only in selected areas and have download speed caps. Max uses the maximum available speeds; no speed is guaranteed. Roam data allowances, taxes, equipment, shipping and promotions depend on the country and service address. Prices below are monthly advertised service prices, not a binding quote.
| Country or territory | Residential 100 / 200 / Max | Roam |
|---|---|---|
| United States · USD | 55 / 85 / 130 USD / month | 100GB: 55 USD · 300GB: 80 USD · Unlimited: 175 USD |
| United Kingdom · GBP | 40 / 60 / 80 GBP / month | 100GB: 55 GBP · Unlimited: 100 GBP |
| Canada · CAD | 75 / 115 / 150 CAD / month | 100GB: 75 CAD · 300GB: 110 CAD · Unlimited: 200 CAD |
| Australia · AUD | 75 / 110 / 150 AUD / month | 100GB: 85 AUD · Unlimited: 210 AUD |
Some links are referral or affiliate links. Eligible orders may earn us a credit or commission. Referral benefits depend on the applicable Starlink conditions.
In the German examples used here, the Starlink antenna faces roughly north. The correct direction and tilt for your actual location come from the Starlink app, which shows how to turn the terminal and warns about significant misalignment. A clear view of the sky matters more than a compass reading alone: trees and roof edges can interrupt the connection. This guide explains which kits need manual alignment, walks through the app using screenshots from our own test, and includes an approximate obstacle calculator. Follow the app’s recommendation at your location rather than treating the German northern-sky examples as a worldwide rule.
No Starlink yet? According to Starlink, you as a new customer will receive a free service month on eligible tariffs via the recommendation link – the 30-day trial phase will be maintained. Whether your location has a clear view, you check in advance for free with the app.
Recommendation Note: The Starlink links in this post are recommendation links. If you order as a new customer on starlink.com, Starlink says you will be credited with a free service month and we will also receive a credit. Your price does not change.
The most important thing in 20 seconds
Grob north
In the northern hemisphere, Starlink tilts slightly north, in the southern hemisphere to the south, according to the manufacturer. The exact direction can deviate to the northeast or northwest.
The app runs live
Under “Alignment”, the app shows a target outline and a swivel arrow. From 5 degrees deviation she warns with “Starlink misaligned”.
Free view counts more
Branches, masts and roofs in the field of view cause interruptions. The app’s camera scan finds the best spot before you drill.
Not every kit
Mini, Standard 4, Standard 4 X and Enterprise align yourself. The older standard with engine turns alone – please do not help there.
Briefly answered: In which direction does Starlink point?
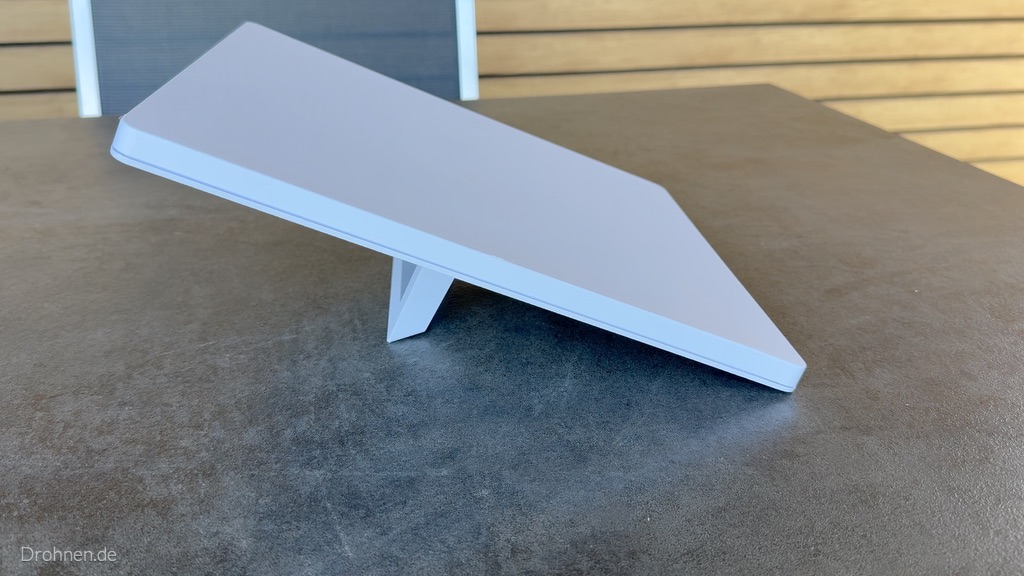
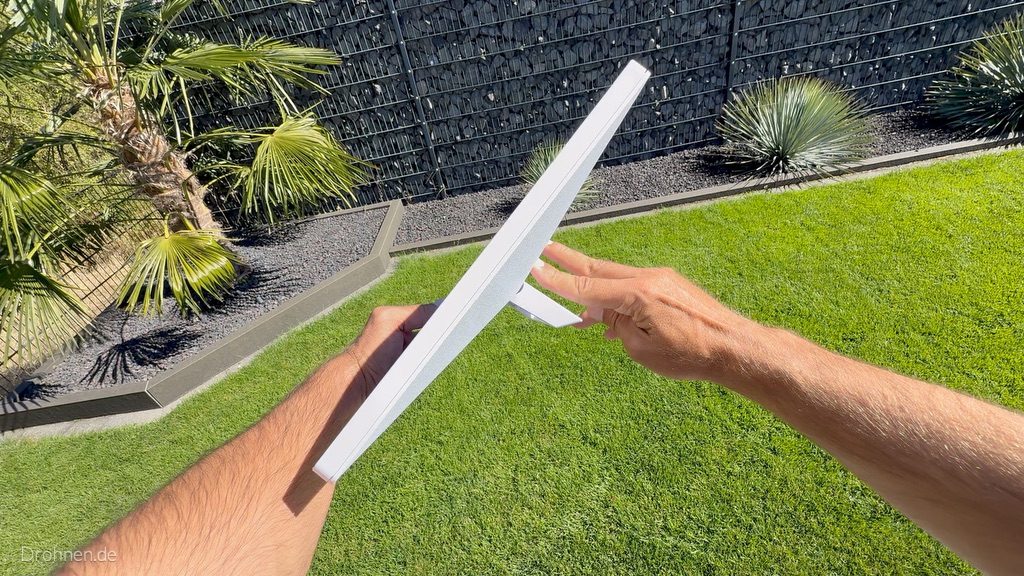
In Germany and the rest of Europe, the Starlink antenna points roughly north and is slightly inclined. Starlink describes this for the standard motorized kit as follows: After the first connection, the terminal tilts into the optimal angle for satellite coverage – “slightly north or south, depending on your location in the northern or southern hemisphere”. With kits without an engine, you can handle this tilt and rotation yourself, guided by the app.
“North” is a rule of thumb, not a fixed value. The app calculates the target direction for your location; in practice, it may diverge a bit to the northwest or northeast. Therefore: set up roughly to the north, then turn exactly to the app display – and above all pay attention to a clear view.
North hemisphere
Germany, Austria, Switzerland and the whole of Europe: the terminal looks roughly north. The app gives the exact direction.
Southern Hemisphere
In Australia, South America or southern Africa, the principle turns around: There Starlink points slightly to the south, according to the manufacturer.
Never lay flat
Starlink warns: A flat or misaligned terminal can get interruptions due to standing rainwater. Always operate with stand or holder inclined.
Why Starlink points north on the northern hemisphere
Starlink explains it briefly: The terminal must be directed to the part of the sky, communicates with satellites most of the time. The fact that this area is located north of Central Europe has two reasons that can be derived from the functioning of the network.
Geometry of orbits
A large part of the Starlink satellites revolve around inclined orbits, reaching their northernmost point at about 53 degrees latitude. There the railways crowd, and from Germany this dense area lies in the northern sky. Further web shells with steeper inclinations complement the cover.
Consideration of the Southern Sky
In the south, as seen from Europe, the arc of the geostationary satellites runs, over which, for example, satellite television runs. Systems like Starlink must not disturb these satellites and therefore avoid directions near this arc.
What is practically called
The northern sky is the most important workspace for your terminal. An obstacle in the north weighs heavier than one in the south – this is exactly what you should pay attention to the location.
Assignment: The two reasons are a technical derivation from trajectory geometry and radio rules; Starlink does not mention them in detail in the help center. Binding for your installation is the target direction that the app displays for your location. How the network works and what the satellites do, ranks our comparison Starlink against fiber optic, DSL and 5G.
Which Starlink kits you have to set up yourself
According to the Help Center, the app’s alignment tool is for Standard 4, Standard 4 X, Enterprise, and Starlink Mini. The datasheets of the current terminals call a “software-assisted manual orientation”: you turn and tilt, the app tells you where to go. The situation is different with the older standard with motor and the flat-mounted performance GEN2.
| Kit | Alignment | Field of view | What you need to do |
|---|---|---|---|
| Starlink Mini / Mini X | software supported manually, orientation tool of the app | 110° | Unfold stand, turn according to app display |
| Standard 4 / Standard 4 X | software supported manually, orientation tool of the app | 110° | Turn and incline in the stand or bracket according to app |
| Starlink V5 | software supported manually according to data sheet | 110° | Align with the instructions of the app |
| Enterprise | software supported manually, orientation tool of the app | 110° | When assembling, align with the app |
| Performance (GEN3) | software supported manually according to data sheet | 140° | Adjust holder according to installation instructions and app |
| Performance (GEN2) | fixed, 8° mounting angle for rain drain | 140° | Flat mount – do not set the cardinal direction |
| Standard Actuated | Motorised self-alignment | 100° | Vertical positioning only, not manual rotation |
The larger field of view of the performance terminals forgives more, but does not replace an unobstructed view. All models in detail – with dimensions, consumption and model finder – compare our Starlink hardware comparison.
Mini or Standard? Which kits and tariffs are available at your address, Starlink shows after entering the address. As a new customer, there is a service month free of charge via the recommendation link.
In the Mini, the stand is firmly on the back. Unfolded, it sets the inclination, the direction you set by turning the whole terminal. If you mount the Mini with the pipe adapter on a mast, align it via the clamping – even then the app leads.
In the standard motorized kit, on the other hand, Starlink explicitly stipulates that the terminal should not be set manually: it levels itself, connects and then automatically tilts into the optimal angle.
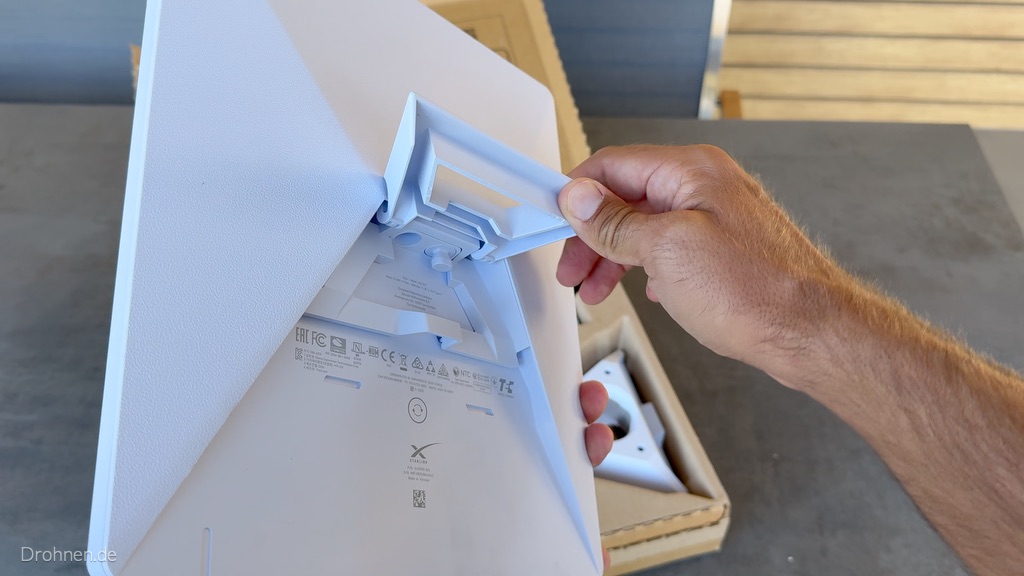
How the Starlink app guides you to the right orientation
The alignment takes place in two stages: first you find a location with clear visibility with the camera scan, then you turn the terminal in the target direction with the alignment tool. Both are in the free Starlink app.
1
Finding location
Select “Find a location” in the app, go to the planned place and point the smartphone camera to the sky.
2
Scanning the sky
The app sets test points over the camera image and marks roof edges, trees and masts in color as an obstacle.
3
Test results
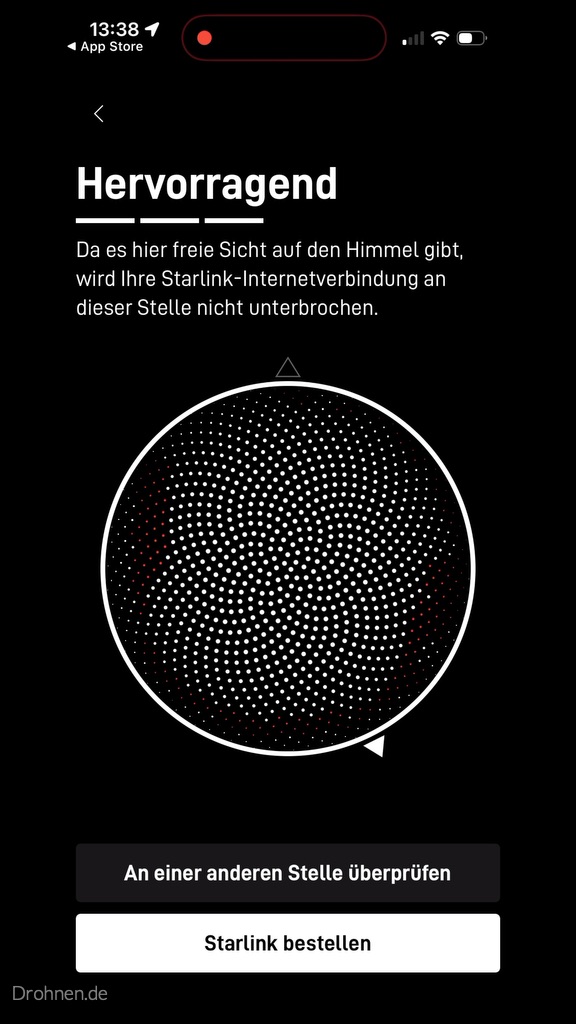
In the end, the app evaluates the location – in the best case with “Outstanding”. Only then set up or assemble.
4
Electricity and connection
Connect cables and wait until the app reports “Starlink is connected”. It takes a few minutes.
5
Orientation
Tap “Align Starlink”: The app shows target outline, compass, and swivel arrow. Turn until the terminal is in outline.
6
Allow calibrating
The obstacle map builds up in the background. According to the app, this takes about an hour, the most stable connection is after about twelve hours.
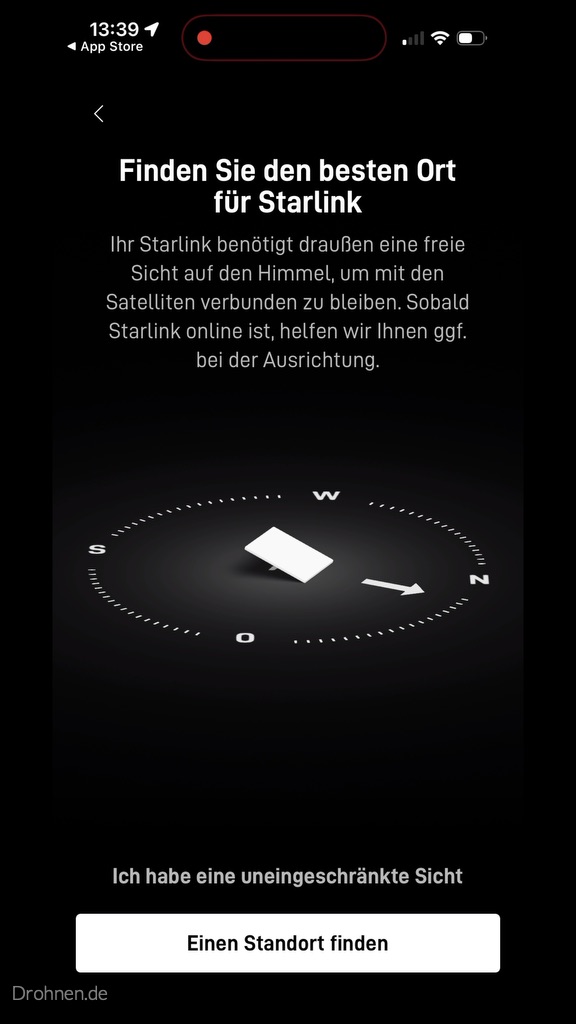
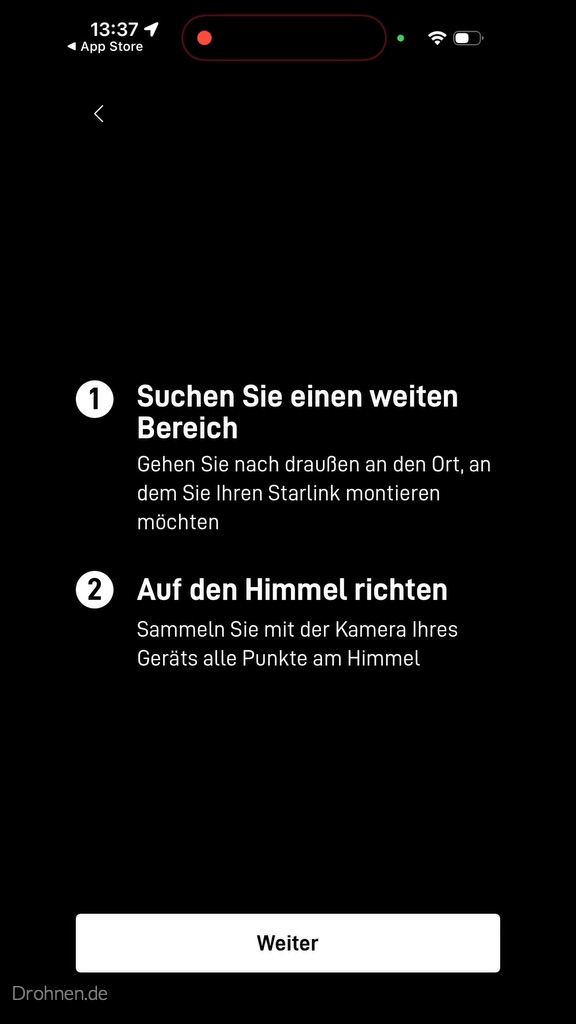
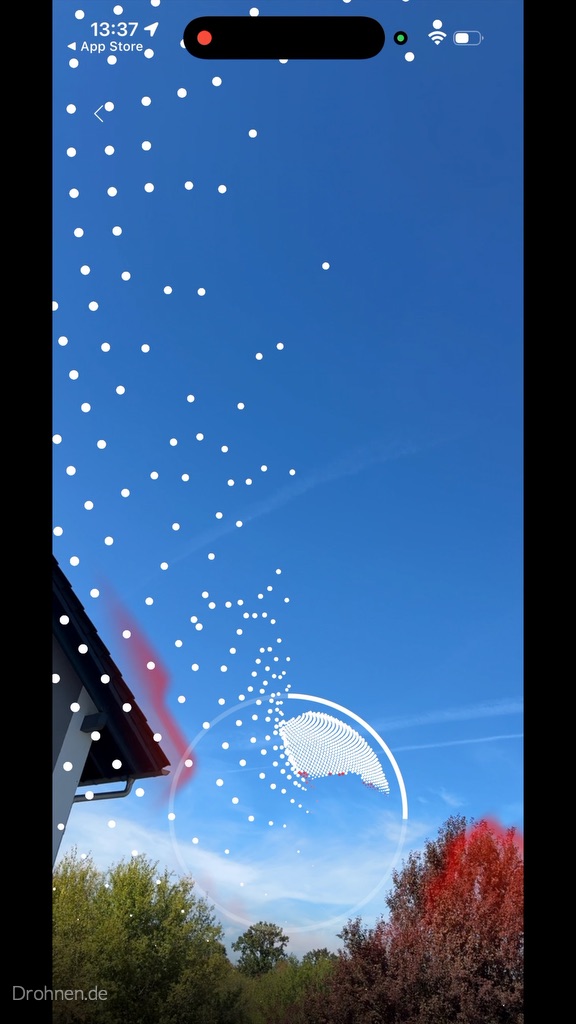
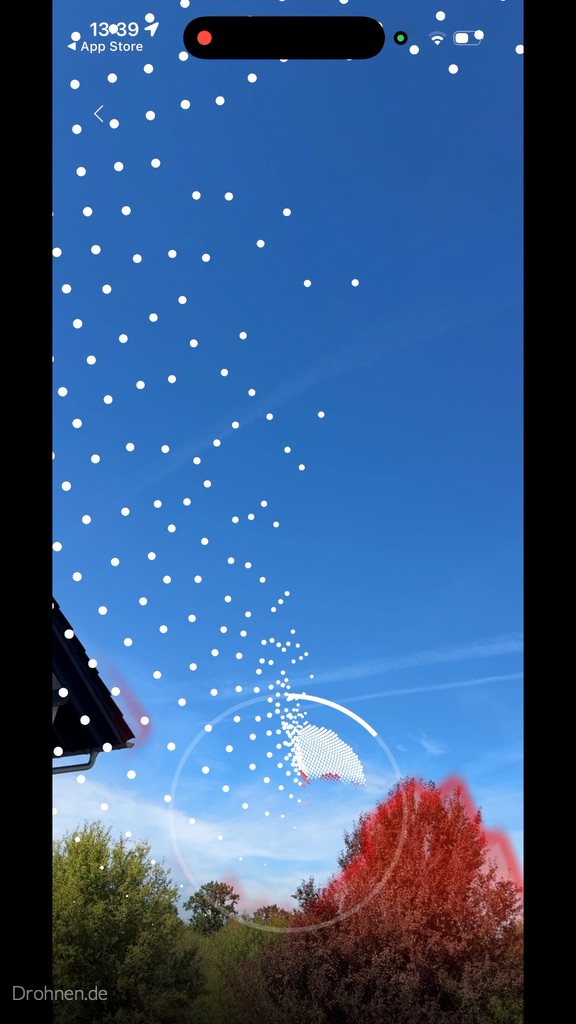
The goal of the scan is a location with „Outstanding“. The app shows the result as a circular sky map. If the rating is worse, a second attempt is worth a few meters further, on the other side of the garden or higher on a mast – before you drill or lay cables.
Important: The scan is a snapshot. Trees that are bare in winter carry foliage in spring; Starlink explicitly cites new leaves as a common cause of sudden obstacle warnings.
Live Turning Assistance: When to Stop Turning
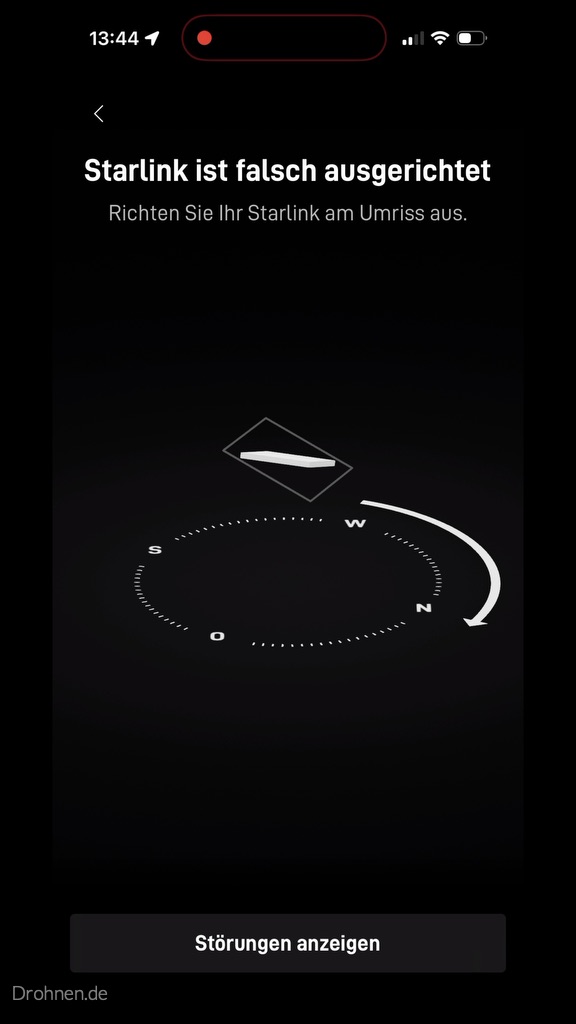
Once the terminal is connected, the app compares its actual location with the destination direction. If it deviates by at least 5 degrees, „Starlink“ appears misaligned. In the alignment tool, you will see a target outline, the cardinal directions as a compass and a curved arrow, which specifies the direction of rotation. You turn the terminal slowly, the display follows in real time – if the terminal is in outline, you are finished. Deviations below 5 degrees are not reported by the app; they are not critical for operation.
Turning slowly
After each movement, wait a moment for the display to follow. Hectic back and forth extends the alignment.
Stop in outline
If the terminal fits into the destination outline and the warning disappears, the alignment is done. You don’t have to be finer.
Check at any time
According to Starlink, the alignment tool remains accessible at the bottom of the home screen – practically after a storm, changeover or location change.
Our hands-on test: Connected – but 41 degrees off
Own Screenshots ·Drohnen.de · September 2026
In our Starlink test with the Mini X, the app reported immediately after the connection: “Starlink is 41° incorrectly aligned.” The connection was nevertheless already – an indication that the large field of view also finds satellites in gross misalignment. But this is not optimal, because the most important sky area is then on the edge instead of in the middle of the field of view.
A tap on “Align Starlink” opened the turning aid: “Raise your Starlink at the outline”, including the compass with N, O, S and W and an arrow that set the rotation towards the north. In the mini, you simply rotate the entire terminal on your stand.
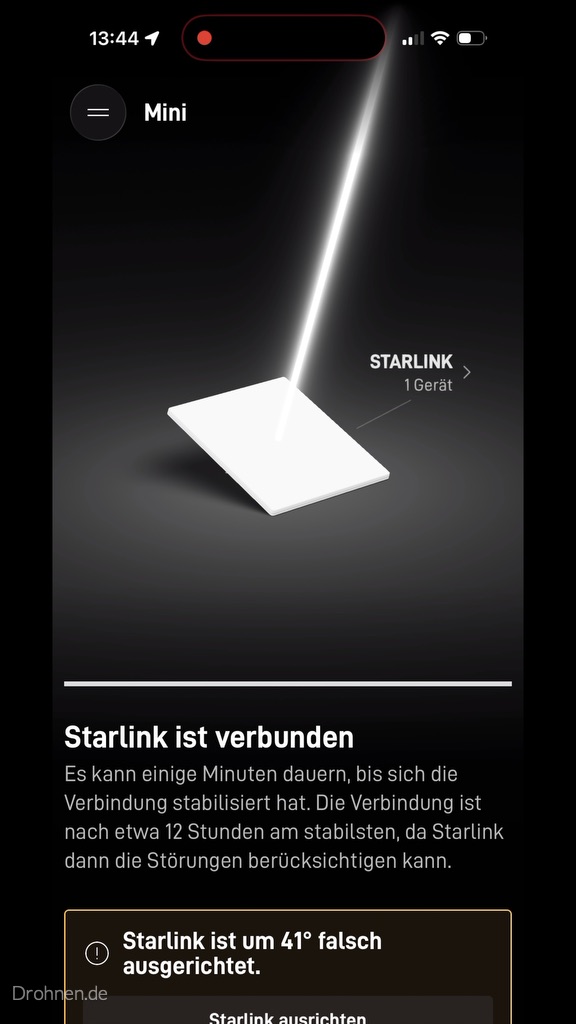
Then the obstacle map calibrates. The disturbances view distinguishes between ‘not mapped’, ‘open view’ and ‘disturbances’. In our test, it said: Starlink is currently being calibrated and collect data about obstacles, normally this takes about an hour. In addition, the app pointed out that the connection is the most stable after about twelve hours, because Starlink can then take the interference into account.
Practically, this means: Do not judge speed and dropouts in the first minutes. The measured values of our test – about 97 Mbit/s in download at 21 millisecond latency – can be found in the detailed test report.
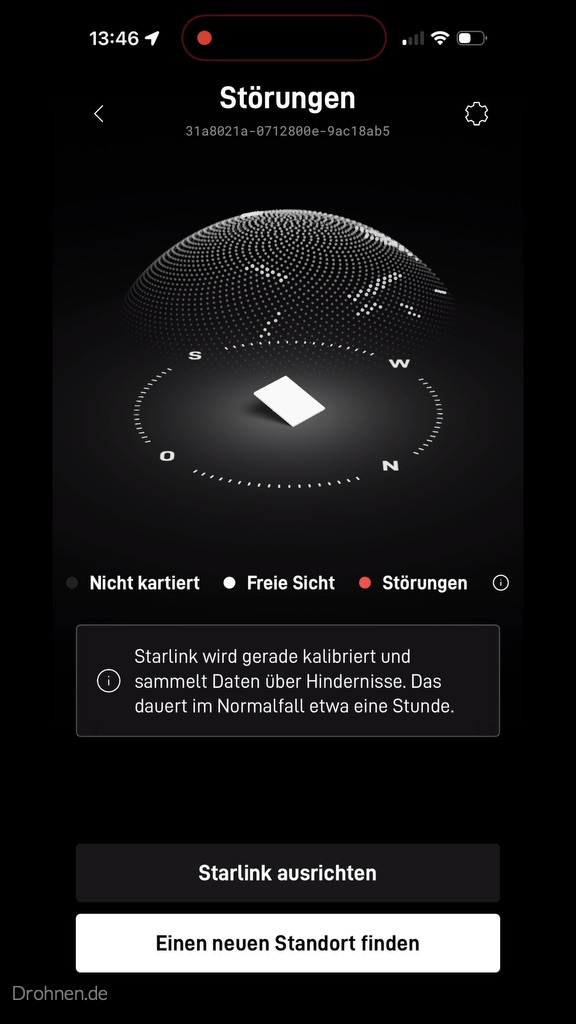
Set up, scan, align – in our test it was about 17 minutes to the first statistic values. Who orders Starlink via the recommendation link, gets credited as a new customer according to Starlink a service month.
Clear visibility: more important than the exact compass angle
Starlink puts it unequivocally: The terminal needs a clear view of the sky so that it remains connected to the satellites as they pass by. A branch, mast or roof in the way causes interruptions in operation. Because the satellites are constantly migrating, an obstacle does not work permanently, but in short dropouts – this is hardly noticeable when streaming, in video calls and online games very well.
| Danger | Typical effect | Solution |
|---|---|---|
| Tree in the North | Recurring short drops, stronger in summer than in winter | Mount higher, scan other place, cut back branches |
| Own roof edge or house wall | Part of the northern sky is permanently missing | On the roof, on the gable or on a mast |
| Mast, lantern, antenna | Small but regular break-in | Move a few meters |
| Neighboring buildings | Large gap in the field of view | Elevated location, check mast with approval |
| Foliage, dirt, snow on the terminal | Sudden obstacle warning after a long rest | Cleaning terminal; snow usually melts automatically |
Obstacle calculator: Does the tree disturb in the north?
The computer estimates whether an obstacle protrudes into the field of view of your terminal. It calculates the height of the obstacle above the antenna and the distance and compares the elevation angle with the edge of the field of view. The result does not replace the camera scan of the app – but it helps with the question of whether a mast or another place is worthwhile.
Obstacle calculator · approximation with manufacturer values to the field of view
Is the obstacle in the field of view of your Starlink?
Enter height above the antenna and distance. The calculation assumes an upwardly directed field of view; because the terminal in Germany is inclined to the north, obstacles in the north count more.
Angle of elevation of obstacle
31°
Field of vision edge (approximation)
35°
Assessment
Borderline
The obstacle lies just below the edge of the field of view. Because it is located in the north, you should check the location with the camera scan of the app.
Calculation path: elevation angle = arctan(height ÷ distance). Edge of the field of view = 90° − field of view ÷ 2 (110° → 35°, 100° → 40°, 140° → 20°). Simplification: Field of view vertically upwards; the actual tilt and target direction sets the app. No replacement for the camera scan and the obstacle map.
The best location: roof, mast, garden or balcony?
According to Starlink, many customers have found that a fixed assembly at an elevated location – roof, mast or wall – provides the best reception. For the alignment, this means that the higher the terminal is, the smaller the trees and neighboring houses in the field of view.
Roof or gable
Usually the clearest view to the north. A firm bracket protects cable and terminal; wind and fastening plan beforehand.
Mast in the garden
Lifts the terminal over hedges and fences. The Mini can be fastened to a rod with the supplied pipe adapter.
Garden, terrace, floor
Works if nothing high stands to the north – as in our test on a plate surface. In the summer, repeat the scan with foliage.
South balcony
The own house wall blocks exactly the northern sky. A balcony on the north side or a place on the railing with a view to the top is much better.
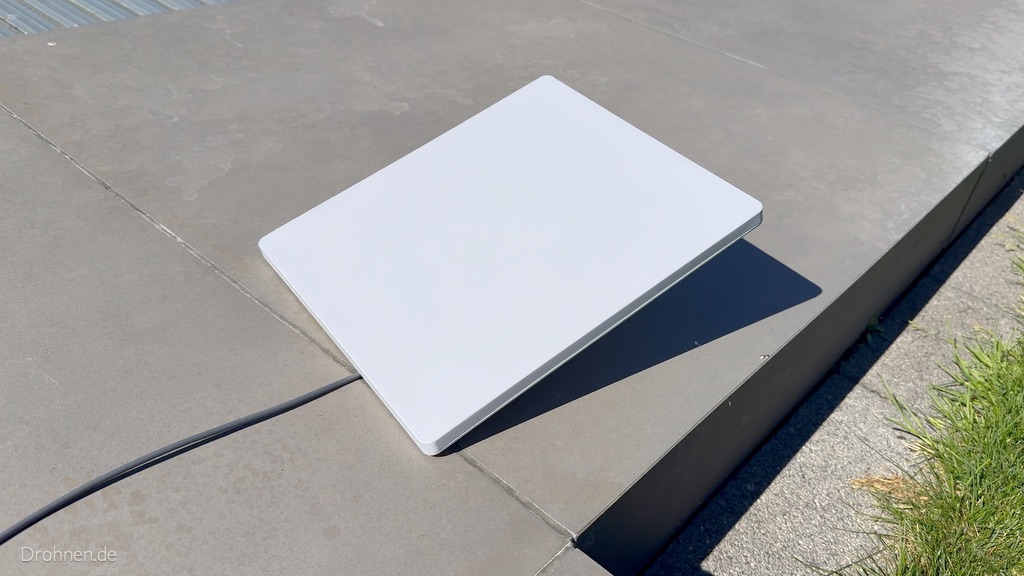
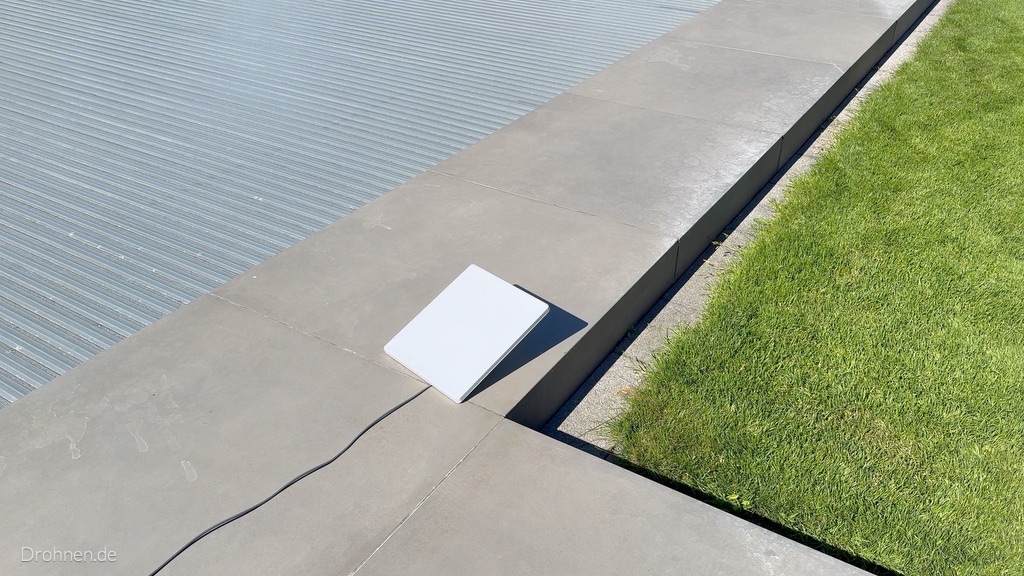
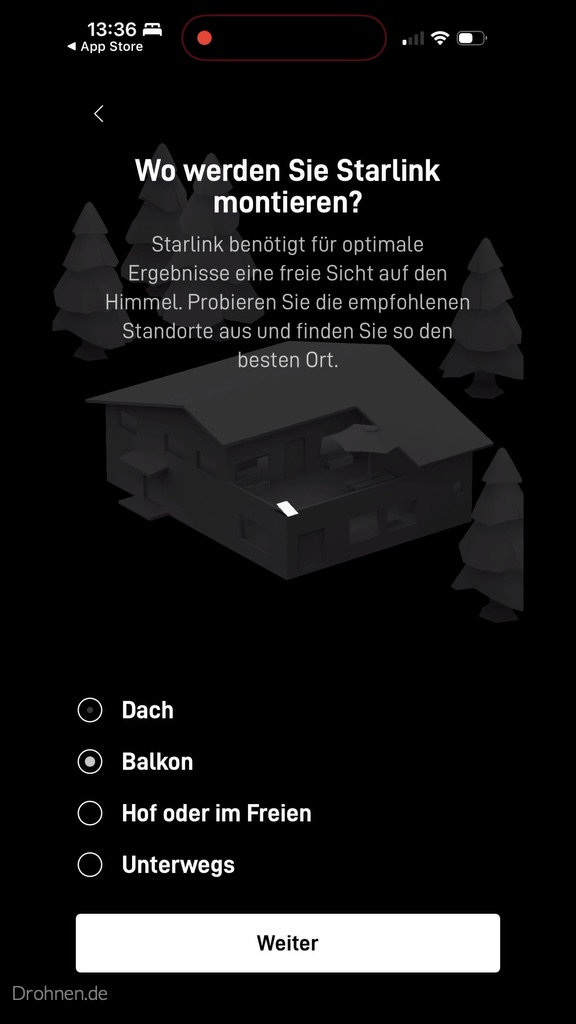
Balcon, garden or roof? The app queries the planned assembly location already at the setup. With the balcony, the orientation is particularly delicate: If it is on the south side, your own house is in the most important part of the field of view.
Whether you are allowed to install a bracket on the balcony, regulate rental contract and house rules. For allotments and arbors, their own rules apply – this is explained by our guide Starlink in the allotment.
Behind glass it does not work reliably
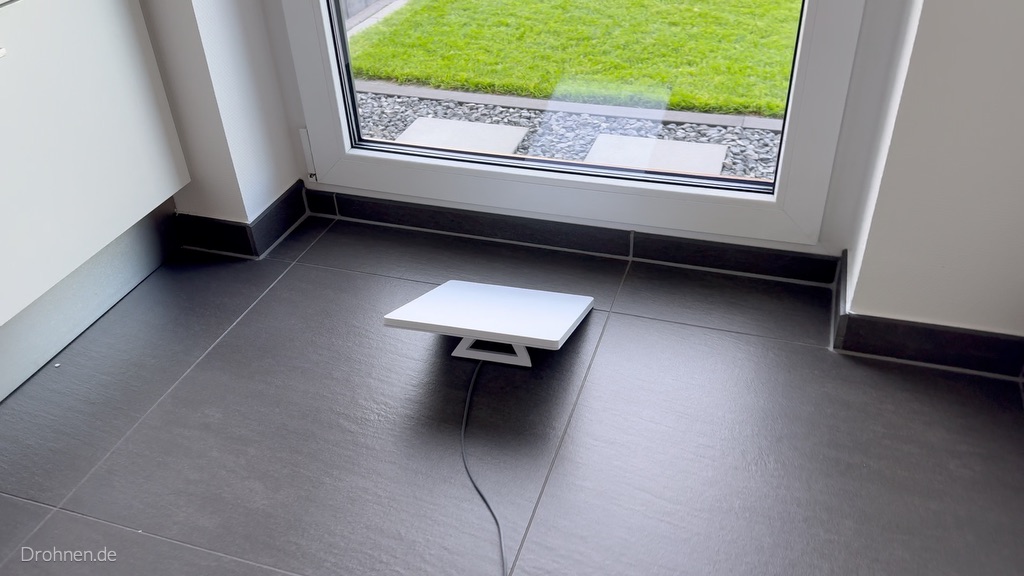
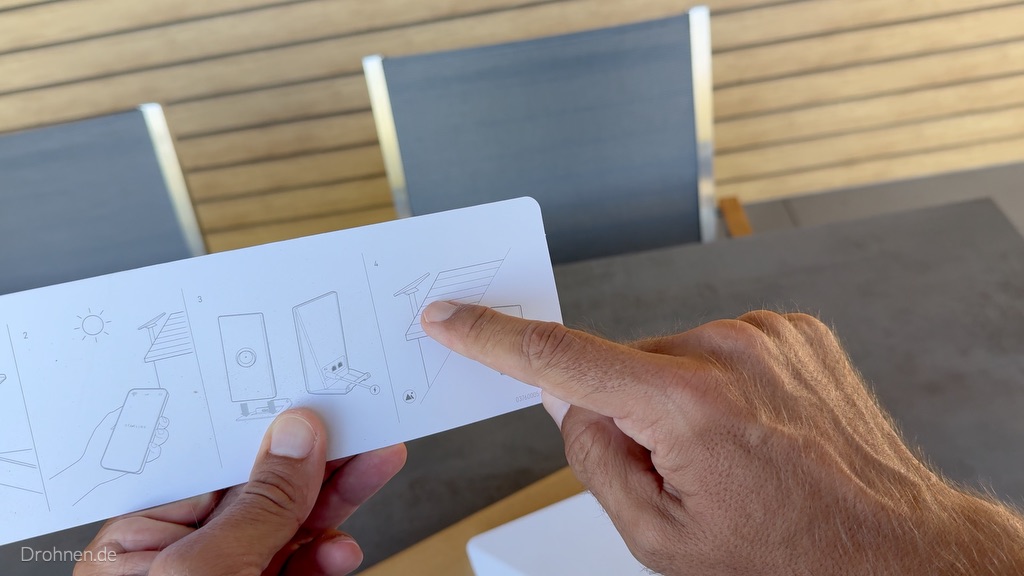
Starlink provides the terminal outdoors, the router belongs in the house – so it also shows the quick guide in the carton. Glass attenuates the signal, especially coated thermal and sun protection glazing. A terminal behind the window pane is therefore at most an emergency solution for the test, not an orientation for everyday life.
Directions on the go: camping, motorhome and trucks
Those who use the Mini when travelling, realign it at every new place. This is fast: roughly north, open the app, align Starlink, finish. On pitches with trees, the camera scan is worthwhile every time – often a pitch continues to decide about dropouts or stable video calls.
Mobile home and camping
Fares, use during the journey and power supply is explained by our guide Starlink in the motorhome and when traveling.
Trucks and long-distance transport
Assembly on the cab, trailer wall as an obstacle in the north and 12/24 volts: everything in the guide Starlink in the truck.
Use in Motion
During the journey, it is not possible to constantly realign. Shared kits and tariffs are available in the hardware and travel guide.
Typical errors in Starlink orientation
Align by compass only
North is the rule of thumb, the target direction is calculated by the app. The mobile phone compass app can also be distracted by metal railings or cars.
Delete flat
Starlink warns of standing rainwater on flat or misaligned terminals. Always use the stand or a holder.
Turn engine kit by hand
For the standard with motor, Starlink explicitly writes: do not adjust manually. The terminal is self-aligned.
Only scan in winter
The bare trees are deceiving. In spring, leaves are added – according to Starlink, a common cause of new obstacle warnings.
Judging too early
According to the app, the obstacle card takes about an hour, the most stable connection is available after about twelve hours.
Don’t restart after switching
Starlink recommends unplugging when repositioning and restarting the device.
Checklist: Align Starlink correctly
Hook the points off. Your progress is only stored in your browser.
0 out of 9 points done
Frequent questions about Starlink orientation
In which direction does Starlink have to point?
In Germany and throughout the northern hemisphere roughly north, slightly inclined. The exact direction – partly to the northwest or northeast – is calculated by the Starlink app for your location. In the southern hemisphere, Starlink points south.
Why does Starlink point north and not south?
According to Starlink, the terminal must point to the sky area where it communicates with satellites most of the time. In Central Europe, this area is located in the north, partly because many satellite orbits crowd there and Starlink avoids the arc of the geostationary satellites in the south.
How exactly does Starlink need to be aligned?
The app warns from a deviation of 5 degrees with “Starlink misaligned”. It does not report minor deviations, they are not critical for operation.
How do I align Starlink with the app?
Once the terminal is connected, tap “Attach Starlink” in the app. The app shows target outline, compass and swivel arrow. Slowly rotate until the terminal is in outline and the warning disappears.
Does Starlink also work if it is misaligned?
Often yes, but not optimally. In our test, the terminal was connected, although the app reported 41 degrees misalignment. Properly aligned, it makes better use of the most important sky area.
Do I have to host the Starlink Mini?
Yes. According to Starlink, the Mini is one of the kits that are aligned manually with the app’s alignment tool – unfolding stands and turning them according to app display.
Can Starlink align automatically?
Only the older standard kit with engine. It levels and tilts automatically and may not be set manually, according to Starlink. Mini, Standard 4, Standard 4 X and Enterprise align yourself.
Does Starlink always have to point exactly north in Germany?
No. North is the rule of thumb for the rough lineup. The app calculates the binding target direction for your location – if it deviates a little to the northwest or northeast, the display of the app applies, not the compass.
Does Starlink have to be aligned to the ground station?
No. The terminal communicates with the satellites, not directly with a ground station. According to Starlink, it is said to point to the sky area where it sees satellites most of the time. You don’t have to know the current satellite position – the terminal itself changes constantly between the satellites.
What angle or inclination does Starlink need?
Starlink does not mention a fixed grade value for all locations. The basic inclination is specified by the stand or holder, the fine alignment takes over the alignment tool of the app. You should not lay the terminal flat because otherwise rainwater can collect on the surface.
How do I test if Starlink is aligned correctly?
In the app: As long as no message “Starlink misaligned” appears, the deviation is below 5 degrees. The alignment tool also remains accessible on the start screen. Whether the view is clear shows obstacle inspection and – after calibration – the fault map of the app.
What does the Starlink card show in alignment?
In the app there is the obstacle map: it marks the sky above the terminal as “not mapped”, “unobstructed view” or “disturbances”. This must be distinguished from the availability card on starlink.com, which only shows whether Starlink can be ordered at an address.
How do I set up Starlink Gen 3?
By “Gen 3” is usually meant the rectangular standard kit with stand, which Starlink itself leads as standard. It doesn’t have an engine: fold out stands, move roughly north and re-turn with the app’s alignment tool – just like with the Mini.
How long does it take to calibrate the obstacle map?
According to the Starlink app, normally about an hour. The connection is most stable after about twelve hours, because Starlink can then take the faults into account.
Can I operate Starlink on a South Balcony?
Possible, but often difficult: your own house wall then blocks the important northern sky. Check the place with the camera scan; a north balcony, roof or mast are usually better.
Does Starlink work behind a window?
Not reliable. Glass, specially coated insulating and sun protection glazing, dampens the signal. The antenna belongs outside, the router into the house.
Do I need to realign Starlink after a move?
Yes. At each new location, the app recalculates the target direction. When repositioning, Starlink also recommends disconnecting the device from the power and restarting it.
How much field of view does Starlink have?
According to datasheets, 110 degrees for Mini, V5, Standard 4 and Enterprise, 100 degrees for the standard with motor and 140 degrees for the performance terminals.
Conclusion: Roughly north, exactly according to app – and clear view above all
The question of the cardinal direction is quickly answered: In Germany Starlink points roughly north, slightly inclined. You don’t have to determine the exact direction yourself – the Starlink app shows it live with the destination outline and arrow and warns when the terminal is more than five degrees away. In our test it was initially 41 degrees, the correction takes only seconds for the Mini.
More important than the compass angle is the location. A free northern sky without tree, roof edge or neighboring house brings more than any fine adjustment. Therefore, first scan, then set up, then align – and treat the obstacle map to its hour of calibration.
Read more: all Starlink guides on Drohnen.de
From the first question “Is it worth it?” to the finished assembly: Here you will find all Starlink guides from Drohnen.de sorted by topic.
Basics and experience
Own hands-on test with the Mini X: furnishings, speed tests and everyday life.
Starlink vs. Fiber, DSL and 5G
Speed, latency, cost and safety in direct comparison.
All providers, GEO or LEO, cost calculator and technology finder.
Costs and tariffs
Starlink Prices and Free Month
All tariffs, one-time fees, rental and termination in detail.
Starlink in the motorhome and when travelling
Travel fares, use in movement and electricity in the camper.
Hardware and assembly
Starlink hardware in comparison
Mini, standard and performance with moderation and consumption.
Roof, wall, mast or balcony – with cable planner.
Starlink brackets in comparison
Original or Amazon: Brackets for Mini and Standard.
Special locations of use
Right, electricity without connection, tariffs and winter break for the arbor.
Internet for long-distance drivers: tariffs, installation and electricity in the cab.
Availability and countries
Starlink availability worldwide
World map with country check and direct link to the Starlink map.
Experience, costs in euros, rental law and cube comparison.
Prices in francs, basic services, Alp and mountain hut.
- Starlink in the test 2026: Speed, latency & experience
- SpaceX IPO time: When does the trade start?
- Starlink Prices October 2026: Fees, discount & 1 month free
- Starlink Hardware 2026: V5, Mini & Standard in comparison
- Starlink Availability worldwide: Map & Countries 2026 check here
- Orient Starlink correctly: cardinal direction, angle & app [instructions]
- Starlink for Motorhome 2026: Travel fares, electricity & hotspot
- Starlink vs. Glass & DSL 2026: Comparison + Safety
- Internet via satellite 2026: provider, costs & comparison
- Powerstation for home office: runtime, size & models 2026
Source, method and liability statement
Statements about the alignment, the alignment tool, the 5-degree warning, the installation and obstacles come from the German Starlink Help Center, retrieved on 29.09.2026. Field of view and alignment specifications of the kits come from the Starlink datasheets, which we have archived in the hardware comparison. The explanation of why Starlink points north in Central Europe is an editorial derivation from railway geometry and radio rules and is not justified in detail by Starlink. Screenshots and photos with the note “Drohnen.de” come from our own test with a Starlink Mini X in September 2026; app texts can change with updates. The obstacle calculator is a geometric approximation and does not replace the camera scan or the obstacle map of the app. Information on installation on roof, mast or balcony is general information; you have to clarify fixing, static as well as rental and ownership rights in individual cases.
Transparency and editorial note: The German original refers to the transparency requirements under Article 50 of the EU AI Act applying from 2 August 2026. Articles are reviewed, put into editorial context and approved before publication. Final assessment and editorial responsibility remain with the editorial team.
For the visual design, we use not only our own and provided shots but also symbol images and illustrations. These can be created or adapted as part of the creation or editing using digital tools. Insofar as there are statutory transparency or labelling obligations for individual contents, these are indicated accordingly.
Individual product boxes and product links in this post are partner links. If you buy through it, our editorial team receives a small commission – the price remains unchanged for you. This has no influence on test results, grades and recommendations.
Sources
Show all sources used
Manufacturer sources – Starlink / SpaceX:
- Help Center: Why do I need to align my Starlink?
- Help Center: What is the alignment tool, and how do I use it?
- Help Center: Where should I mount my Starlink?
- Help Center: How to fix trouble
- Help Center: Standard Starlink kit with motor – Instructions
- Starlink video for alignment
- Starlink Mini product data sheet, German version (PDF)
Editorial secondary sources: